How is the effort calculated?
Basically Tredict calculates the effort from 3 different data sources.
- Heart rate
- Power (wattage)
- Speed
If possible, the time series recorded by your device will be used.
The total effort is derived from the total duration of the activity and the heart rate series. This is also done analogously with the wattage and speed, if available.
In the case of the heart rate, the effort is determined every second and added up further and further.
The amount of effort per second is roughly calculated as follows:
Effort from the heart rate
The effort is calculated from the current heart rate in relation to capacity. The capacity is calculated from maximum heart rate and resting heart rate.Effort from the power
The effort is calculated from the current power or wattage in relation to your FTP (Functional Threshold Power).Effort from the speed
The effort is calculated from the current speed in relation to your FTPa (Functional Threshold Pace).There is also a multiplier, which depends on the intensity and is explained below.
If you are a female athlete, the calculated effort is increased by an additional 20%. The increase is based on a comparison of world-class lists in athletics.
Redundant effort calculation from different zone types
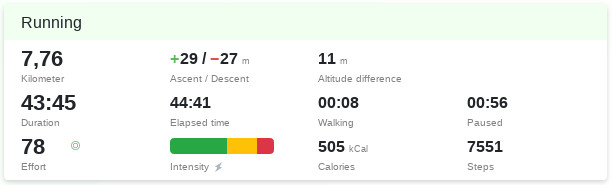
The summary of a run with the effort from the power
Redundantly calculated efforts"effort": { "heartrate": 70, "power": 78, "pace": 86, }
As you can see in the upper block, 3 efforts are calculated for this run. But in the summary of the run only the effort from the power is shown.
This is because I have set my zone priority chain as follows:
Power -> Heart rate -> Speed
So Tredict first uses the effort from power. If this is not available, because I forgot my Stryd for example, Tredict takes the effort from the heart rate and if this is also not available, the effort is calculated from the speed.
Now you might ask yourself what happens if there is no speed either? Well, then Tredict calculates a "fallback" effort, which assumes that the activity took place at 75% of your maximum heart rate. That can be off the mark at times, of course.
You can set the zone priority chain here: Tredict - Settings
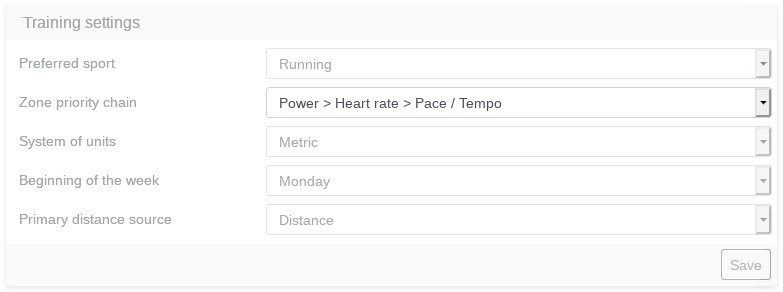
Settings for zone priority
How do my zones influence the calculation of the effort?
As you can see above in the effort object, the effort for heart rate, power and speed are quite different.
In this case this is because my zones are not optimally adjusted.
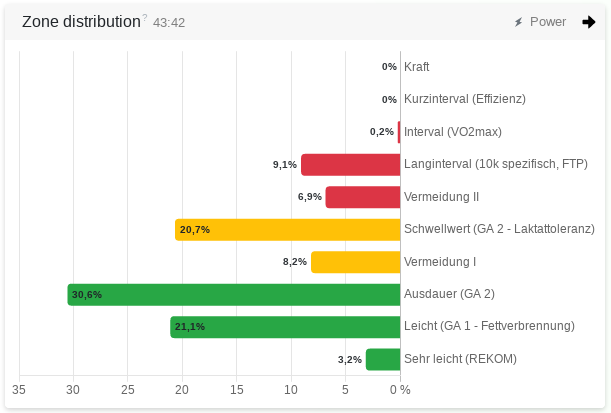
For the run, these power zones were used as the basis for calculation.
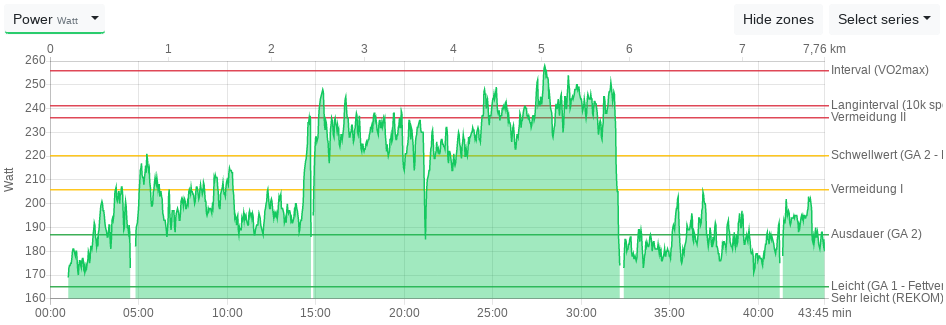
Power zones in the series view
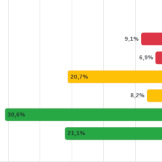
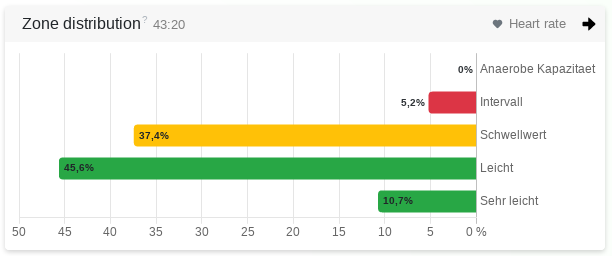
Let's have a look at the intensity distribution, which can also be seen in the summary of the run above:
Distribution of intensity from power
Low intensity: 54,9 %
Moderate intensity: 28,9 %
High intensity: 16,2 %
What was concealed above:
The effort per second is rated higher if it is in a moderate intensity and even perceptibly higher if it is in a high intensity.
A multiplier is applied.
This means that an activity with 30 minutes in low intensity has less effort than 30 minutes in high intensity.
If we now look at the heart rate zone distribution of the run, we can see that it is much less located in a high intensity than the power zone distribution.
The zone distribution for the heart rate has a lower intensity compared to the power zones.
Distribution of intensity from heart rate
Low intensity: 56,9 %
Moderate intensity: 37,8 %
High intensity: 5,3 %
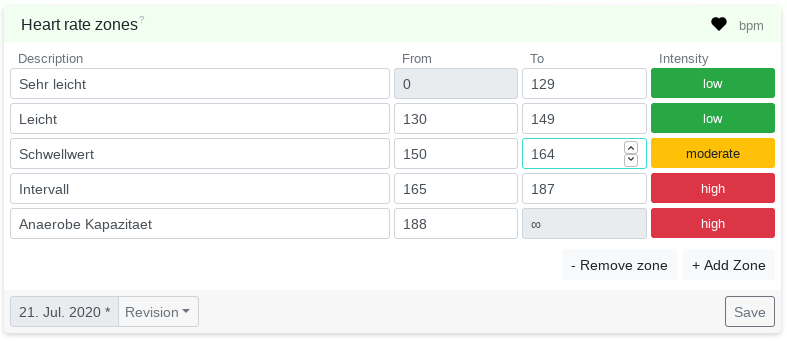
Let's now adjust the heart rate zones so that they better match the performance zones. You will know which values to take into account by finding out your lactactact threshold and FTP.
First, we create a new revision and adjust the date accordingly, so that this run is affected. Now I have simply lowered the moderate threshold zone by 3-4 heartbeats.
A new zone revision for heart rate.
After saving, Tredict immediately recalculates all activities which are influenced by the revision date.
The new heart rate distribution is now much closer to the power distribution.

Zone distribution after revision adjustment.
Heart rate and power effort now match"effort": { "heartrate": 75, "power": 78, "pace": 86, }
The effort of heart rate and power now match well compared to before.
Compare zones to determine the form
Now that you understand how to align different zones, you have a powerful tool to validate your general form.
For example, if you had your heart rate and power zones well aligned in, say, April, by taking different power determination tests, you can see if these zones diverge over time.
-
If the efforts and intensities in the watt power zone remain the same, but the effort from the heart rate is getting higher and higher, then you probably just lose your form.
-
Conversely, you can speak of a form gain if the effort from the heart rate always remains the same and the effort from the wattage decreases.
Performance curve
Since the performance curve is calculated from the effort, it is important for precise results to set the zones well and use the zone priority chain that is appropriate for a self fitting zone.
You can find out which zone priority chain is suitable for you in the FAQ.
I hope you liked the article and I could show you some context.